배포 진행 순서

1. docker swarm init 초기화

2. django에서 보안 사항들을 docker secrets에 저장

3. docker secrets에 저장한 보안 사항들을 배포할때 django project로 불러오기

4. docker image를 만들기위한 Dockerfile 생성

4-1. portainer에서 docker image 생성

5. docker stack를 위한 docker-compose.yml 생성

6. docker stack 생성 및 실행

1. docker swarm init 초기화

https://docs.docker.com/engine/reference/commandline/swarm_init/


docker swarm init

docker swarm init: Initialize a swarm. The docker engine targeted by this command becomes a manager in the newly created single-node swarm.

docs.docker.com

docker swarm init

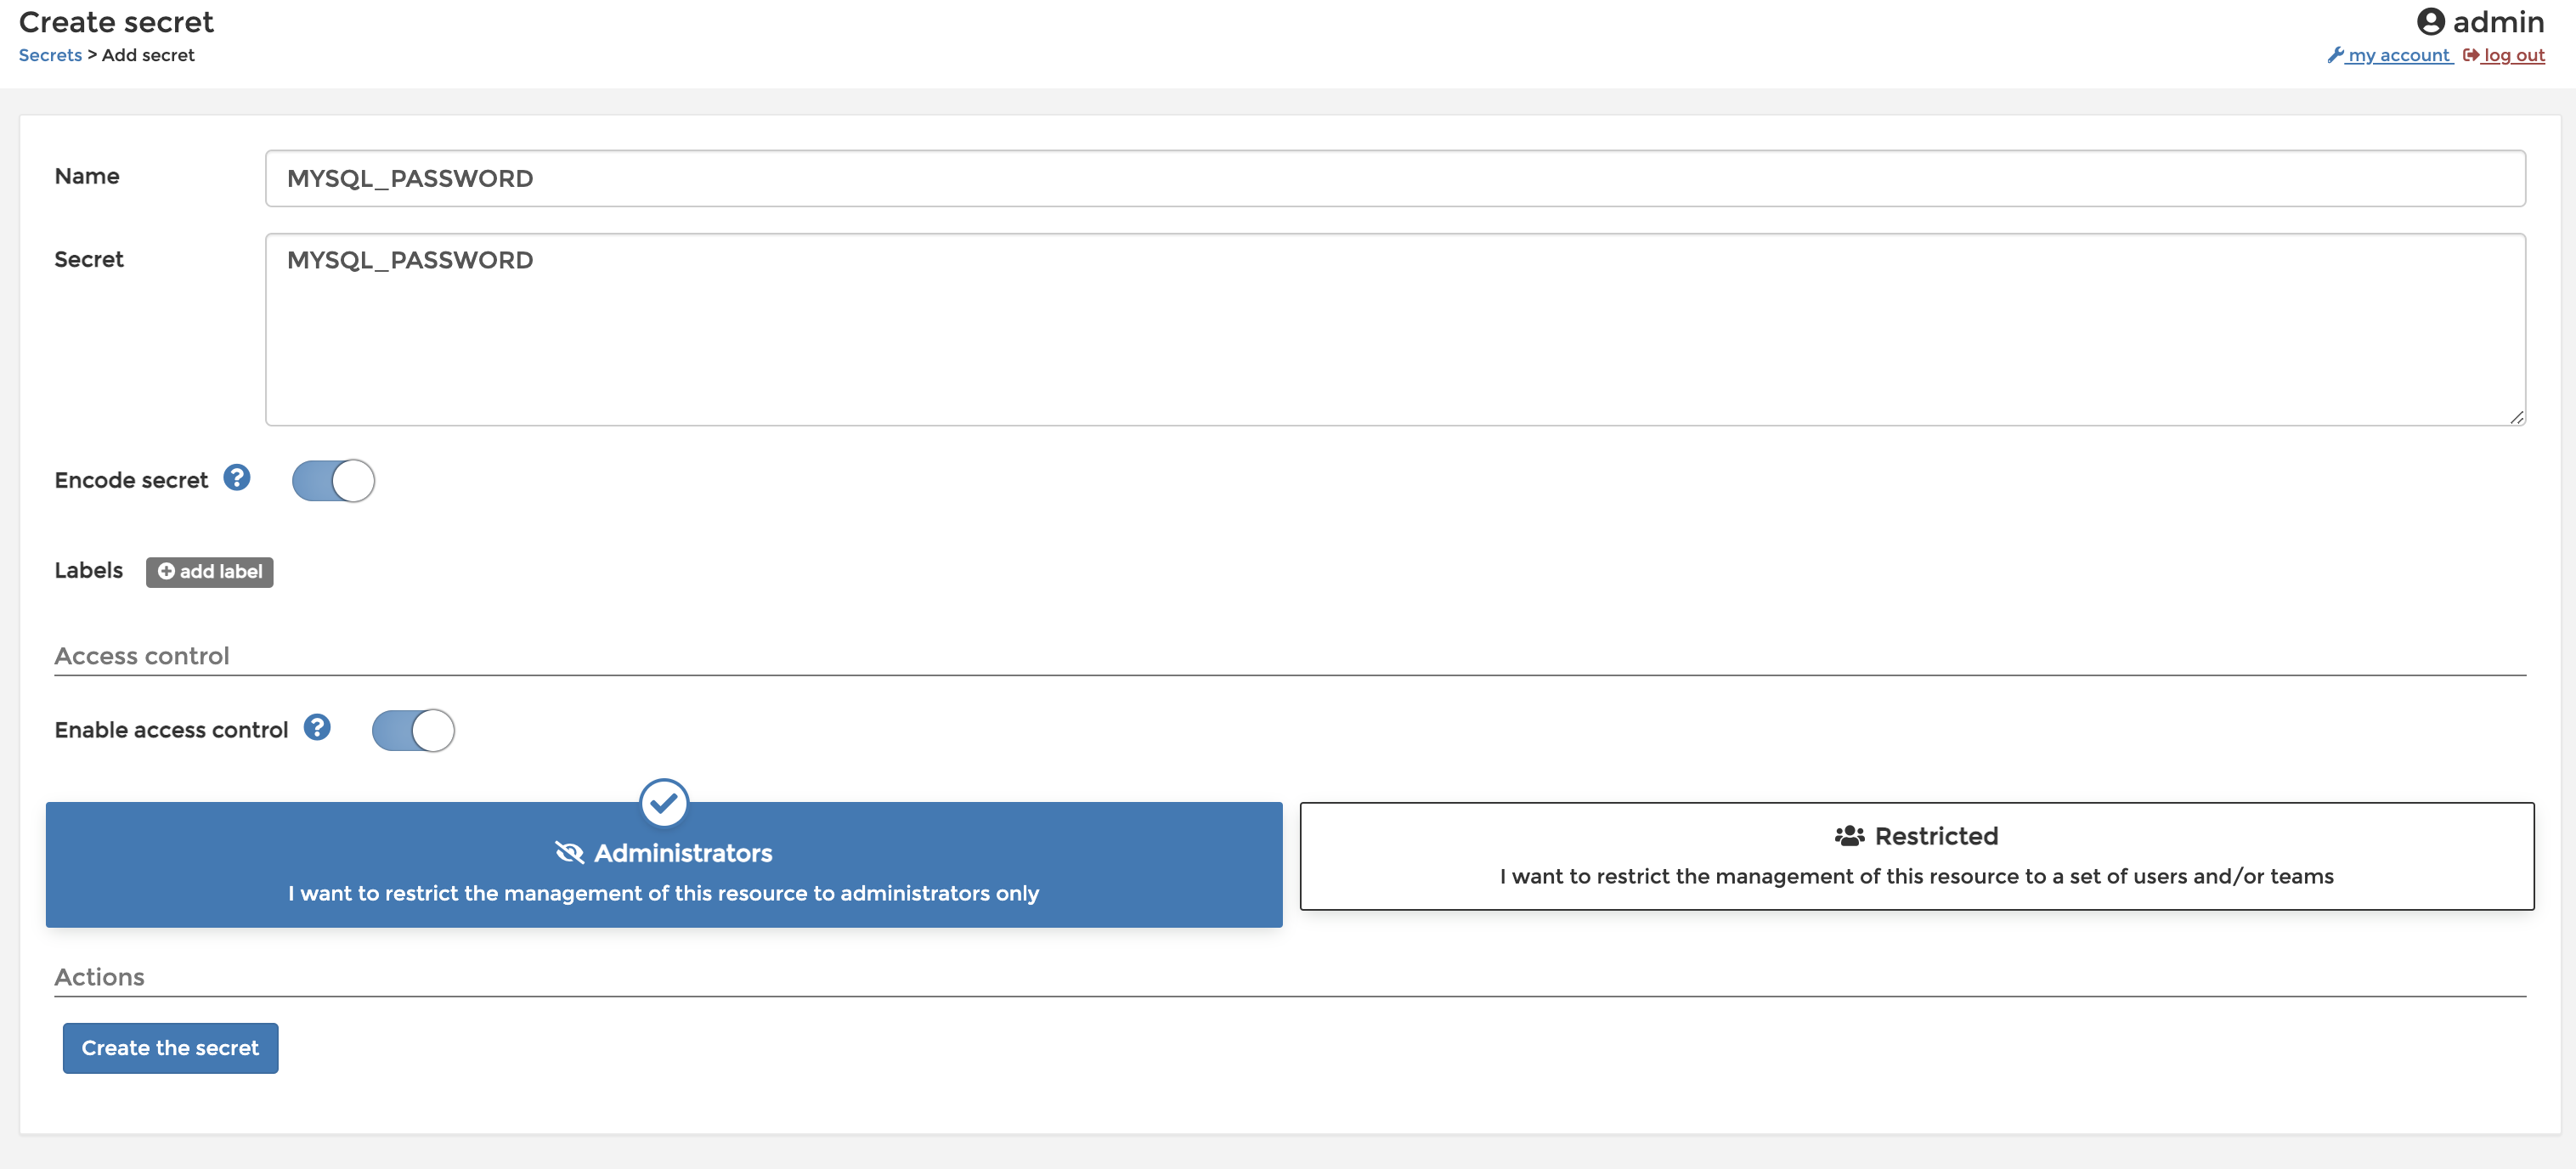
2. django에서 보안 사항들을 docker secrets에 저장

portainer -> secrets -> add secrets

아래와 같이 django secret key 등 생성
3. docker secrets에 저장한 보안 사항들을 배포할때 django project로 불러오기

django secrets 에 저장한 내용은 /run/secrets/ 위치에 저장됨

settings.py 나 deploy.py 등 배포에 사용할 환경파일에서 파일을 읽어 사용

# docker secrets의 파일 읽어오기

def read_secret(secret_name):
    file = open("/run/secrets/" + secret_name)
    secret = file.read()
    secret = secret.rstrip().lstrip()
    file.close()

    return secret

# 실제 사용
SECRET_KEY = read_secret("DJANGO_SECRET_KEY")

4. docker image를 만들기위한 Dockerfile 생성

- 파이썬 3.9 버전 위에서

FROM python:3.9.0

- /home 폴더 위치로 이동하여 (없으면 생성)

WORKDIR /home/

- github에서 프로젝트 소스코드를 가져와서 다운

RUN git clone [https://github.com/{user}/{project}.git](https://github.com/mugon-dev/django-pinterest.git)

- 다운받은 폴더로 이동하여

WORKDIR /home/[project](https://github.com/mugon-dev/django-pinterest.git)/

- 라이브러리를 설치하고

RUN pip install -r requirements.txt

- container에 8000번 포트를 열어주고

EXPOSE 8000

- 배포 환경으로 실행하는데 static파일들을 한 곳에 모으고, migrate하고 8000번 포트에 bind해서 실행

CMD ["bash", "-c", "python manage.py collectstatic --noinput --settings=config.settings.deploy && python manage.py migrate --settings=config.settings.deploy && gunicorn --env DJANGO_SETTINGS_MODULE=config.settings.deploy config.wsgi --bind 0.0.0.0:8000"]

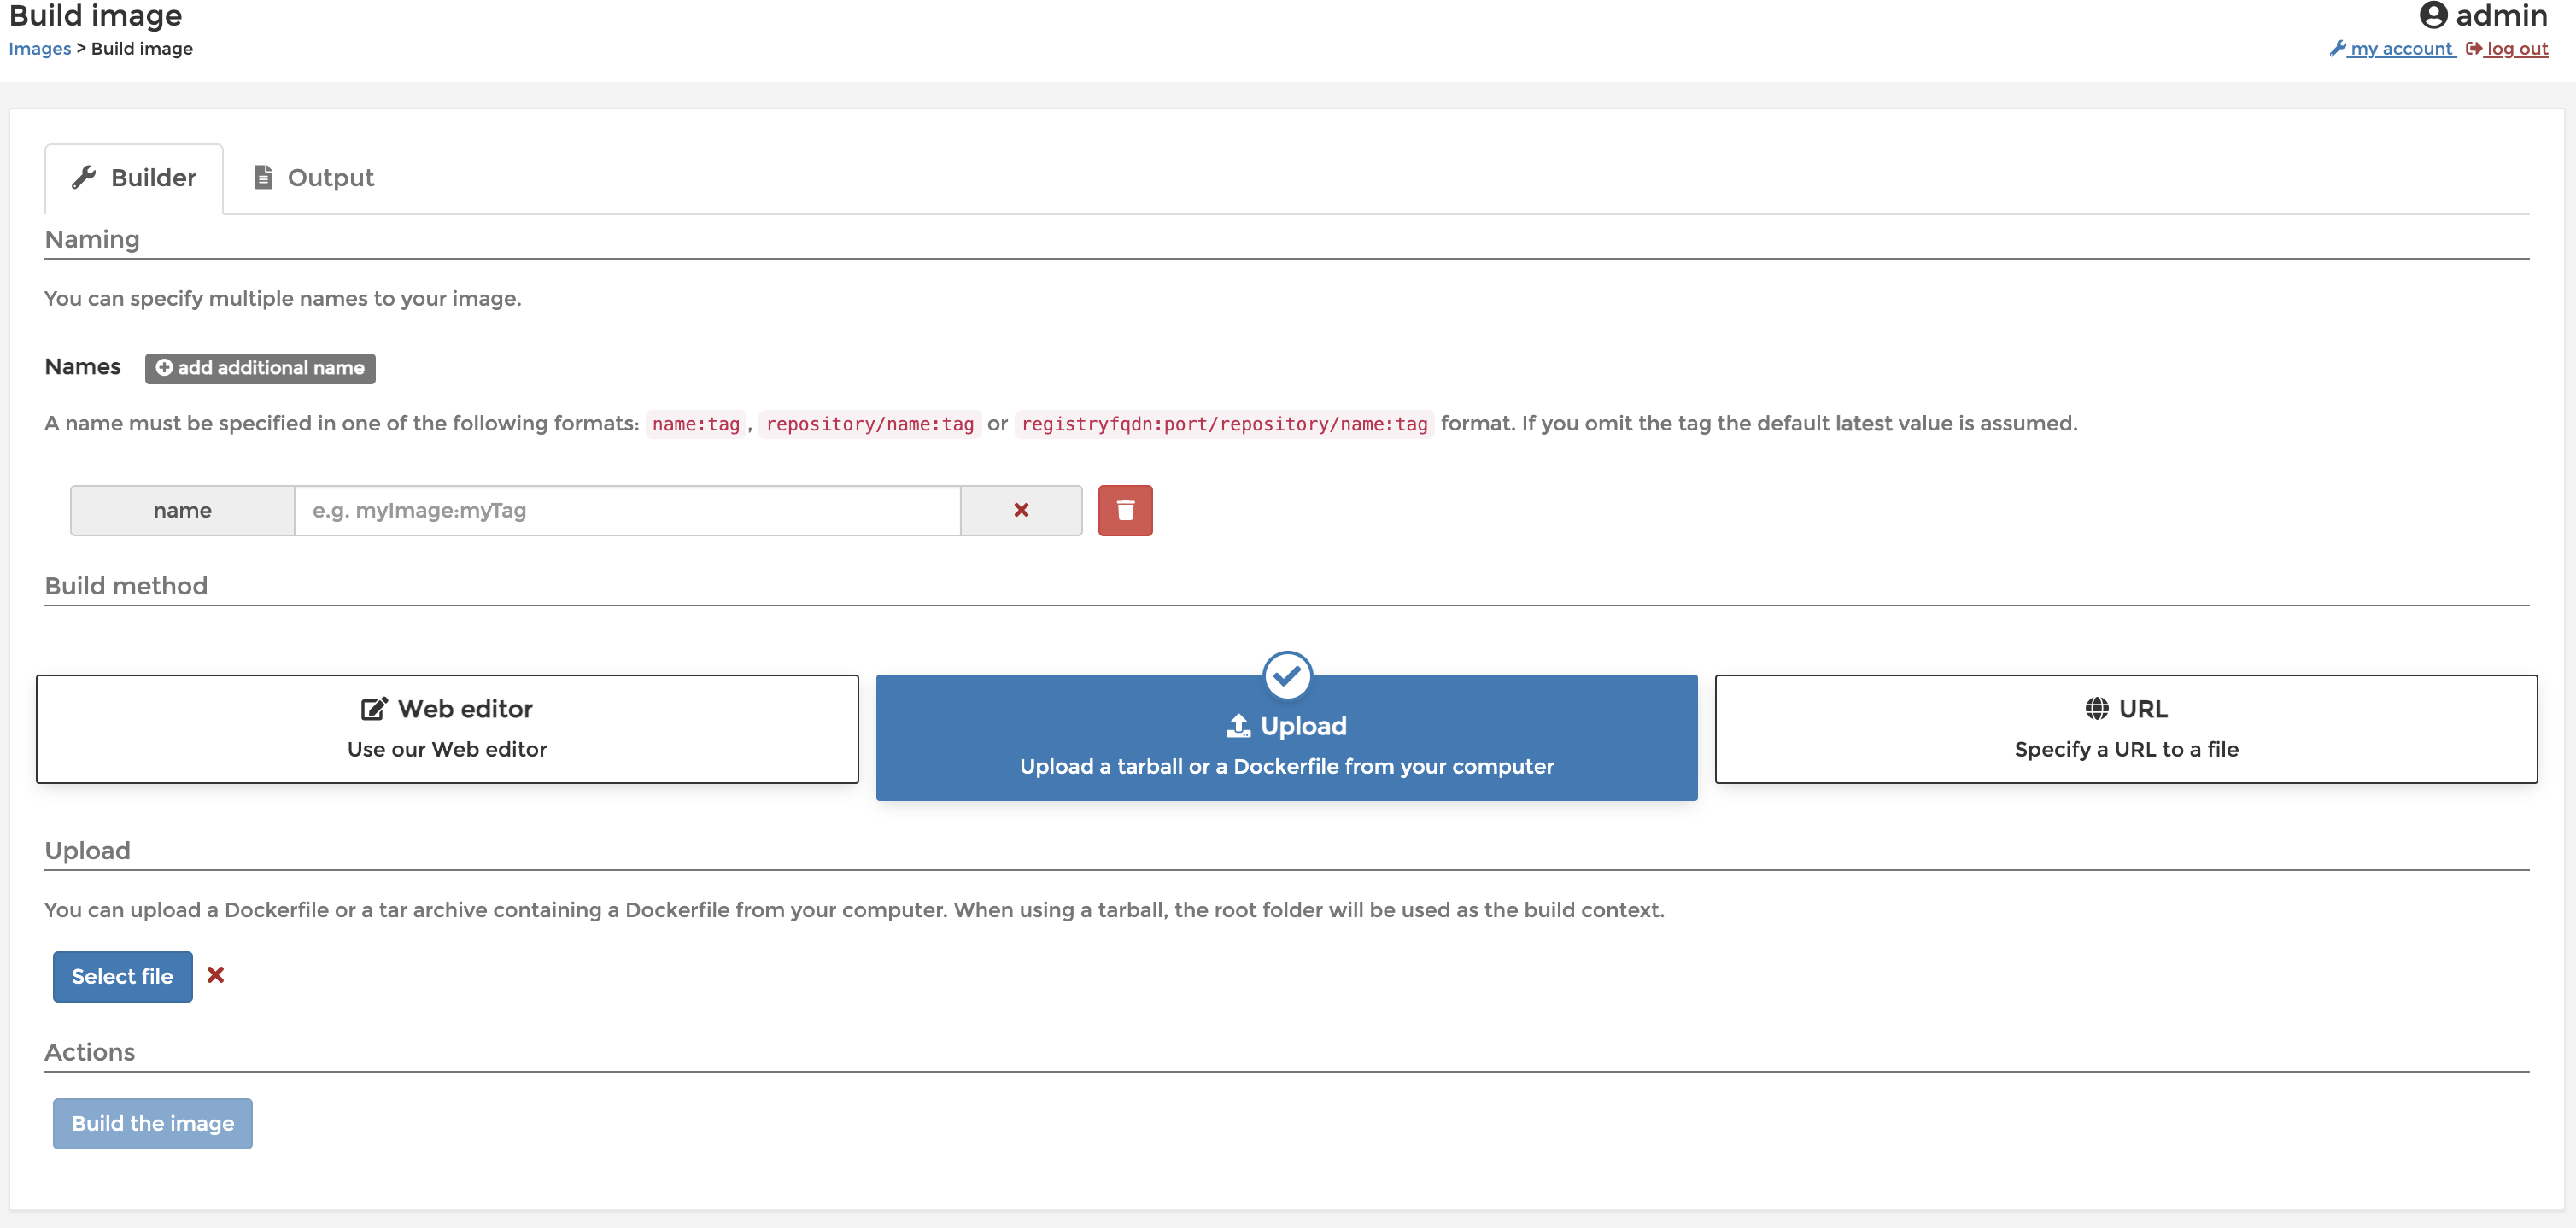
4-1. portainer 에서 docker image 만들기

portainer -> images -> build a new image

upload 탭에서 위에서 만든 Dockerfile 불러와 생성
5. docker stack를 위한 docker-compose.yml 생성

# docer compose 버전
version: "3.7"
# docker service 생성
services:
# nginx container 생성
  nginx:
  # nginx image 불러오기
    image: nginx:1.19.5
    # nginx가 속할 network
    networks:
      - network
    # voluems 정의
    volumes:
    # 내가 올린 nginx.conf를 nginx폴더의 nginx.conf와 연결
      - /home/django_course/nginx.conf:/etc/nginx/nginx.conf
      # volumes에 저장할 파일들의 경로
      - static-volume:/data/static
      - media-volume:/data/media
    # nginx가 사용할 ports
    ports:
      - 80:80
  # django container 생성
  # container name은 nginx.conf에서 hostname과 동일하게 작성
  django_container_gunicorn:
    # 위에서 만든 image 불러오기
    image: django_test_image:5
    # 장고가 속할 네트워크
    networks:
      - network
    # volumes에 저장할 파일들의 경로
    volumes:
      - static-volume:/home/django-pinterest/staticfiles
      - media-volume:/home/django-pinterest/media
    # 위에서 저장한 django secrets에서 가져올 파일
    secrets:
      - MYSQL_PASSWORD
      - DJANGO_SECRET_KEY
  # mariadb container 생성
  # container name은 djago settings의 host명과 동일하게 작성
  mariadb:
      # 사용할 이미지
    image: mariadb:10.5
    # 사용할 네트워크
    networks:
      - network
    # volumes에 저장할 db 데이터
    volumes:
      - maria-database:/var/lib/mysql
    # 위에서 저장한 django secrets에서 가져올 파일
    secrets:
      - MYSQL_PASSWORD
      - MYSQL_ROOT_PASSWORD
    # maria db의 환경변수
    # docker secrets에서 패스워드 가져오기
    environment:
      MYSQL_DATABASE: django
      MYSQL_USER: django
      MYSQL_PASSWORD_FILE: /run/secrets/MYSQL_PASSWORD
      MYSQL_ROOT_PASSWORD_FILE: /run/secrets/MYSQL_ROOT_PASSWORD

# 사용할 네트워크
networks:
  network:

# 사용할 volume
volumes:
  static-volume:
  media-volume:
  maria-database:

# 사용할 secrets
secrets:
  DJANGO_SECRET_KEY:
    external: true
  MYSQL_PASSWORD:
    external: true
  MYSQL_ROOT_PASSWORD:
    external: true

6. docker stack 생성 및 실행

portainer -> stack -> add stack

upload 탭에서 위에서 만든 docker-compose.yml 불러와서 생성

7. 확인

portainer -> swarm -> go to cluster visulizer

728x90

'Study > Django' 카테고리의 다른 글

[Django] gunicorn  (0) 2021.05.28
[Django] 배포를 위한 환경파일 분리  (0) 2021.05.28
[Django] field lookup  (0) 2021.05.25
[Django] decorator  (0) 2021.05.25
[Django] code formatting black 설치 및 적용  (0) 2021.05.20

CGI Common Gateway Interface

웹 서버 프로그램의 기능의 주체는 미리 준비된 정보를 이용자(클라이언트)의 요구에 응답해 보내는 것이다. 그 때문에 서버 프로그램 그룹에서는 정보를 그 장소에서 동적으로 생성하고 클라이언트에 송신하려하는 조합을 작성하는 것이 불가능했다. 서버 프로그램에서 다른 프로그램을 불러내고, 그 처리 결과를 클라이언트에 송신하는 방법이 고안되었다. 이를 실현하기 위한 서버 프로그램과 외부 프로그램과의 연계법을 정한 것이 CGI이다

여러 언어들이 사용자들의 다양한 요청을 이해할 수 있게 "이 문(인터페이스)을 지나면 이러한 형태가 됩니다"하고 정해놓은 규약이자 프로그램

WSGI Web Server Gateway Interface

파이썬 스크립트가 웹 서버와 통신하기 위해 만들어진 인터페이스

CGI를 설명한 것과 같이 웹서버에서의 요청을 해석하여 파이썬 응용프로그램에 던지는 역할

Gunicorn이나 uWSGI는 Apache나 nginx로 들어오는 HttpRequest를 Python이 이해할 수 있게
동시통역하여 던져주는 애들

Gunicorn 설치

https://gunicorn.org/


Gunicorn - Python WSGI HTTP Server for UNIX

Deployment Gunicorn is a WSGI HTTP server. It is best to use Gunicorn behind an HTTP proxy server. We strongly advise you to use nginx. Here's an example to help you get started with using nginx: server { listen 80; server_name example.org; access_log /var

gunicorn.org

pip install gunicorn
  • Replace runserver -> gunicorn command
gunicorn myproject.wsgi
  • Dockerfile cmd 변경
CMD ["gunicorn", "myproject.wsgi", "--bind", "0.0.0.0:8000"]
728x90

패키지 생성

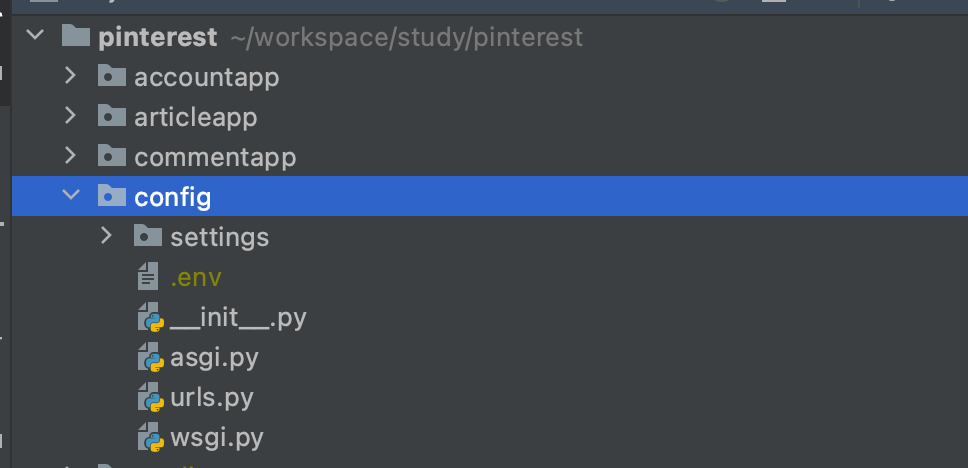
project를 시작할때 만든 settings.py의 위치에서 settings package를 생성

settings.py 이동

settings.py 를 base.py로 이름 변경 후 settings 패키지로 이동

local, deploy 파일 생성

settings 패키지안에 local.py, deploy.py 생성

환경변수 분리

공통 사항은 base.py

  • apps
  • static path ...

로컬 환경은 local.py

  • local에서 사용하는 db
  • debug, allowed host 등

배포 환경은 deploy.py

  • docker secrets 에서 가져오는 비밀번호 및 키
  • 배포환경에서 사용하는 db
# local.py

import os, environ
from .base import *

env = environ.Env(
    # set casting, default value
    DEBUG=(bool, False)
)
# reading .env file
environ.Env.read_env(env_file=os.path.join(BASE_DIR, ".env"))

# Quick-start development settings - unsuitable for production
# See https://docs.djangoproject.com/en/3.2/howto/deployment/checklist/

# SECURITY WARNING: keep the secret key used in production secret!
SECRET_KEY = env("SECRET_KEY")

# SECURITY WARNING: don't run with debug turned on in production!
DEBUG = env("DEBUG")

ALLOWED_HOSTS = ["*"]


# Database
# https://docs.djangoproject.com/en/3.2/ref/settings/#databases

DATABASES = {
    "default": {
        "ENGINE": "django.db.backends.sqlite3",
        "NAME": BASE_DIR / "db.sqlite3",
    }
}
# deploy.py

import os, environ
from .base import *

# docker secrets에서 가져오는 비밀키
def read_secret(secret_name):
    file = open("/run/secrets/" + secret_name)
    secret = file.read()
    secret = secret.rstrip().lstrip()
    file.close()

    return secret


env = environ.Env(
    # set casting, default value
    DEBUG=(bool, False)
)
# reading .env file
environ.Env.read_env(env_file=os.path.join(BASE_DIR, ".env"))

# Quick-start development settings - unsuitable for production
# See https://docs.djangoproject.com/en/3.2/howto/deployment/checklist/

# SECURITY WARNING: keep the secret key used in production secret!
SECRET_KEY = read_secret("DJANGO_SECRET_KEY")

# SECURITY WARNING: don't run with debug turned on in production!
DEBUG = False

ALLOWED_HOSTS = ["*"]


# Database
# https://docs.djangoproject.com/en/3.2/ref/settings/#databases

DATABASES = {
    "default": {
        "ENGINE": "django.db.backends.mysql",
        "NAME": "django",
        "USER": "django",
        "PASSWORD": read_secret("MYSQL_PASSWORD"),
        "HOST": "mariadb",
        "PORT": "3306",
    }
}

manage.py 설정

아래의 os.environ.setdefault 부분 수정

두번째 인자에 python manage.py runserver 명령어를 사용할때 실행할 파일 연결

# root 폴더의 manage.py

#!/usr/bin/env python
"""Django's command-line utility for administrative tasks."""
import os
import sys


def main():
    """Run administrative tasks."""
    os.environ.setdefault("DJANGO_SETTINGS_MODULE", "config.settings.local")
    try:
        from django.core.management import execute_from_command_line
    except ImportError as exc:
        raise ImportError(
            "Couldn't import Django. Are you sure it's installed and "
            "available on your PYTHONPATH environment variable? Did you "
            "forget to activate a virtual environment?"
        ) from exc
    execute_from_command_line(sys.argv)


if __name__ == "__main__":
    main()

배포 파일 실행

아래와 같이 runserver 에 --settings 옵션을 줘서 실행

python manage.py runserver --settings=config.settings.deploy
728x90

'Study > Django' 카테고리의 다른 글

[Docker] portainer를 활용한 docker secrets, swarm, stack, image  (0) 2021.05.28
[Django] gunicorn  (0) 2021.05.28
[Django] field lookup  (0) 2021.05.25
[Django] decorator  (0) 2021.05.25
[Django] code formatting black 설치 및 적용  (0) 2021.05.20

field lookup

공식문서

https://docs.djangoproject.com/en/3.0/ref/models/querysets/#id4

  • SQL의 WHERE에 해당되는 기능

  • QuerySet메소드인 filter(), exclude(), get()등에 키워드 인자로 지정

  • 어떤 lookup type에도 해당이 안 될 경우(Example.objects.get(id=1)) 자동적으로 exact로 적용

  • 사용법은 fieldname__lookuptype (Example.objects.get(id__exact=1)


exact

정확하게 일치하는 값을 검색.

None값을 넣게 되면 SQL의 IS NULL 구문을 사용하는 것과 같다.

# WHERE id = 14;
Entry.objects.get(id__exact=14) 
# WHERE id IS NULL;
Entry.objects.get(id__exact=None) 

iexact

대소문자의 구분없이 정확하게 일치하는 값을 검색.

None값을 넣게 되면 SQL의 IS NULL구문을 사용 하는 것과 같다.

# WHERE name ILIKE 'beatles blog';
Blog.objects.get(name__iexact='beatles blog')
# WHERE name IS NULL;
Blog.objects.get(name__iexact=None)

contains

대소문자를 구분하고 문자열을 포함하고 있는 것을 검색.

# WHERE headline LIKE '%Lennon%';
Entry.objects.get(headline__contains='Lennon')

icontains

대소문자를 구분하지 않고 문자열을 포함하고 있는 것을 검색.

# WHERE headline ILIKE '%Lennon%';
Entry.objects.get(headline__icontains='Lennon')

in

  • 주어진 iterable한 객체(리스트, 튜플, 쿼리셋)에 포함되어 있는지 검색.

    # WHERE id IN (1,3,4);
    Entry.objects.filter(id__in=[1,3,4])
  • 쿼리셋을 사용하여 동적으로도 검색이 가능하다.

    # WHERE blog.id IN (SELECT id FROM ... WHERE NAME LIKE='%Cheddar%')
    inner_qs = Blog.objects.filter(name__contains='%Cheddar%')
    entries = Entry.objects.filter(blog__in=inner_qs)
  • values() 나 values_list()를 쓸 __in에 쓸 경우 결과 값은 하나의 필드만을 반환 해야 한다.

    inner_qs = Blog.objects.filter(name__contains='Ch').values('name')
    entries = Entry.objects.filter(blog__name__in=inner_qs)
  • 만약 두개의 필드로 반환하는 values()를 할 경우 TypeError를 raise를 시킬 것이다.

    # Bad code! Will raise a TypeError.
    inner_qs = Blog.objects.filter(name__contains='Ch').values('name', 'id')
    entries = Entry.objects.filter(blog__name__in=inner_qs)
  • 중첩된 쿼리를 사용 할 때는 데이터베이스의 성능 특성을 이해하고 써야 한다. 일부 데이터베이스의 경우 중첩 쿼리를 잘 처리 하지 못한다. 그래서 __in에 대한 list 목록을 미리 추출하여 두번째 쿼리에 해당 list를 사용 하는것이 더 좋다.

    values = Blog.objects.filter(name__contains='Cheddar').values_list('pk', flat=True)
    entries = Entry.objects.filter(blog__in=list(values))

    두번째 쿼리에서 list()를 사용하여 첫번째 쿼리를 강제로 실행. 중첩 쿼리를 실행하지 않게 한다. - in을 실행하면서 Entry를 계속 검색하는데 거기서 values 쿼리가 중복하여 실행된다. 그것을 방지.

gt, gte

  • gt : ~보다 큰.
  • gte : ~보다 크거나 같은.
    # WHERE id > 4;
    Entry.objects.filter(id__gt=4)
    # WHERE id >= 4;
    Entry.objects.filter(id__gte=4)

lt, lte

  • lt : ~보다 작은.
  • lte : ~보다 작거나 같은.
    # WHERE id < 4;
    Entry.objects.filter(id__lt=4)
    # WHERE id <= 4;
    Entry.objects.filter(id__lte=4)

startswith, istartswith

  • startswith : 대소문자를 구분하여 시작하는 문자열.
  • istartswith: 대소문자를 구분하지 않고 시작하는 문자열.
    # WHERE headline LIKE 'Lennon%';
    Entry.objects.filter(headline__startswith='Lennon')
    # WHERE headline ILIKE 'Lennon%';
    Entry.objects.filter(headline__istartswith='Lennon')

endswith, iendswith

  • endswith : 대소문자를 구분하여 끝나는 문자열.
  • iendswith: 대소문자를 구분하지 않고 끝나는 문자열.
    # WHERE headline LIKE '%Lennon';
    Entry.objects.filter(headline__endswith='Lennon')
    # WHERE headline ILIKE '%Lennon';
    Entry.objects.filter(headline__iendswith='Lennon')

range

  • 범위를 안에 있는지 검색.
    start_date = date(2005, 1, 1)
    end_date = date(2005, 3, 31)
    # WHERE pub_date BETWEEN '2005-01-01' and '2005-03-31';
    Entry.objects.filter(pub_date__range(start_date, end_date))
  • SQL에서 BETWEEN을 날짜, 숫자, 문자에서 사용하는 것처럼 range도 사용 가능하다.
    날짜가 있는 DateTimeField를 필터링 하는 경우 마지막 날의 항목은 포함하지 않는다. 왜냐하면 주어진 날짜의 오전 0시로 경계가 설정되기 때문.
    WHERE pub_date BETWEEN '2005-01-01 00:00::00' and '2005-03-31 00:00:00';
  • 일반적으로 dates와 datetimes를 섞어쓰면 안된다.

date

  • datetime 필드의 경우 값을 날짜로 변환한다. 추가 체인이 가능하고, date값을 사용 한다.
    Entry.objects.filter(pub_date__date=datetime.date(2005, 1, 1))
    Entry.objects.filter(pub_date__date__gt=datetime.date(2005, 1, 1))

year

  • date 및 datetime의 필드에서 년도가 정확히 일치하는 것을 검색한다. 추가 체인 필드 검색이 가능하고 정수를 나타낸다.
    # WHERE pub_date BETWEEN '2005-01-01' AND '2005-12-31';
    Entry.objects.filter(pub_date__year=2005)
    # WHERE pub_date >= '2005-01-01';
    Entry.objects.filter(pub_date__year__gte=2005)

month

  • date 및 datetime의 필드에서 달이 정확히 일치하는 것을 검색한다. 추가 체인 필드 검색이 가능하고 정수1 부터 12까지 나타낸다.
    # WHERE EXTRACT('month' FROM pub_date) = '12';
    Entry.objects.filter(pub_date__month=12)
    # WHERE EXTRACT('month' FROM pub_date) >= '6';
    Entry.objects.filter(pub_date__month__gte=6)

day

  • date 및 datetime의 필드에서 일이 정확히 일치하는 것을 검색한다. 추가 체인 필드 검색이 가능하고, 정수를 나타낸다.
    # WHERE EXTRACT('day' FORM pub_date) = '3';
    Entry.objects.filter(pub_date__day=3)
    # WHERE EXTRACT('day' FORM pub_date) >= '3';
    Entry.objects.filter(pub_date__day__gte=3)

week

  • date 및 datetime의 필드에서 ISO-8601의 기준에 따라 주 번호(1-52 또는 53)을 반환한다. 즉 월요일에 시작하는 주 및 첫번째 주는 목요일에 시작한다.
    Entry.objects.filter(pub_date__week=52)
    Entry.objects.filter(pub_date__week__gte=32, pub_date__week__lte=38)

week_day

  • date 및 datetime 필드에서 요일과 정확하게 일치 하는 것을 검색한다. 추가 체인 필드 검색이 가능하다. 정수1 부터 7까지 나타낸다.
    Entry.objects.filter(pub_date__week_day=2)
    Entry.objects.filter(pub_date__week_day__gte=2)
    연도와 월에 상관없이 1(일요일)과 7(토요일)사이에서 색인된다.

quarter

  • date 및 datetime 필드에서 분기가 정확하게 일치 하는 것을 검색한다. 추가 체인 필드 검색이 가능하며, 1년의 1/4인 1에서 4까지 나타낸다.
    # 2분기 검색
    Entry.objects.filter(pub_date__quarter=2)

time

  • datetime필드의 경우 값을 시간으로 변경하여 검색. 추가 체인 필드 검색이 가능하고, datetime.time값을 사용한다.
    Entry.objects.filter(pub_date__time=datetime.time(14, 30))
    Entry.objects.filter(pub_date__time__between=(datetime.time(8), datetime.time(17)))

hour

  • datetime 및 time 필드에서 시간이 정확하게 일치하는 것을 검색한다. 추가 체인 필드 검색이 가능하며, 0에서 23사이를 나타낸다.
    # WHERE EXTRACT('hour' FROM timestamp) = '23';
    Event.objects.filter(timestamp__hour23)
    # WHERE EXTRACT('hour' FROM time) = '5';
    Event.objects.filter(time_hour=5)
    # WHERE EXTRACT('hour' FROM timestamp) >= '12';
    Event.objects.filter(timestamp__hour__gte=12)

minute

  • datetime 및 time 필드에서 분이 정확하게 일치하는 것을 검색한다. 추가 체인 필드 검색이 가능하며, 0에서 59사이를 나타낸다.
    # WHERE EXTRACT('minute' FROM timestamp) = '29';
    Event.objects.filter(timestamp__minute=29)
    # WHERE EXTRACT('minute' FROM time) = '46';
    Event.objects.filter(time__minute=46)
    # WHERE EXTRACT('minute' FROM timestamp) >= '29';
    Event.objects.filter(timestamp__minute__gte=29)

second

  • datetime 및 time 필드에서 초가 정확하게 일치하는 것을 검색한다. 추가 체인 필드 검색이 가능하며, 0에서 59사이를 나타낸다.
    # WHERE EXTRACT('second' FROM timestamp) = '31';
    Event.objects.filter(timestamp__second=31)
    # WHERE EXTRACT('second' FROM time) = '2';
    Event.objects.filter(time__second=2)
    # WHERE EXTRACT('second' FROM timestamp) >= '31';
    Event.objects.filter(timestamp__second__gte=31)

isnull

  • IS NULL 과 IS NOT NULL에 대한 True, False값을 검색한다.
    # WHERE pub_date IS NULL;
    Entry.objects.filter(pub_date__isnull=True)

regex, iregex

  • regex : 대소문자를 구분하여 정규식을 검색.
  • iregex : 대소문자를 구분하지 않고 정규식을 검색.
    # WHERE title REGEXP '^(An?|The) +';
    Entry.objects.get(title__regex=r'^(An|The) +')
    # WHERE title REGEXP '(?i)^(an?|the) +'l;
    Entry.objects.get(title__iregex=r'^(an?|the) +'
    정규식을 전달하기 위해 r을 붙이는게 좋다.
728x90

'Study > Django' 카테고리의 다른 글

[Django] gunicorn  (0) 2021.05.28
[Django] 배포를 위한 환경파일 분리  (0) 2021.05.28
[Django] decorator  (0) 2021.05.25
[Django] code formatting black 설치 및 적용  (0) 2021.05.20
[Django] 환경 변수 분리하기 django-environ  (0) 2021.05.18

decorator

decorator ?

함수를 받아 명령을 추가한 뒤 이를 다시 함수의 형태로 반환하는 함수이다.
함수의 내부를 수정하지 않고 기능에 변화를 주고 싶을 때 사용한다 .
일반적으로 함수의 전처리나 후처리에 대한 필요가 있을때 사용을 한다.
또한 데코레이터를 이용해, 반복을 줄이고 메소드나 함수의 책임을 확장한다

decorator는 원래 작업의 앞 뒤에 추가적인 작업을 손쉽게 사용 가능하도록 도와주는 역할

데코레이터의 구조

함수형

def out_func(func):  # 기능을 추가할 함수를 인자로

    def inner_func(*args, **kwargs):

        return func(*args, **kwargs)

    return inner_func

example

# decorator 정의
def decorator(func):
    def wrapper(*args, **kwargs):

        print('전처리')   
        print(func(*args, **kwargs))
        print('후처리')
    return wrapper

# decorator 사용
@decorator
def example():
    return '함수'

#############
example()
'''''''''
전처리
함수
후처리
'''''''''

클래스형

class Decorator:

    def __init__(self, function):
        self.function = function

    def __call__(self, *args, **kwargs):
        return self.function(*args, **kwargs)

example

class Decorator:

    def __init__(self, function):
        self.function = function

    def __call__(self, *args, **kwargs):
        print('전처리')
        print(self.function(*args, **kwargs))
        print('후처리')

@Decorator
def example():
    return '클래스'

example()
'''''''''
전처리
클래스
후처리
'''''''''

django decorator

FBV

from django.contrib.auth.decorators import login_required
from django.shortcuts import render

# 방법 1
@login_required
def post_create(request):
  # 생략
  return render(request, 'core/index.html')


# 방법 2
def post_create(request):
  # 생략
  return render(request, 'core/index.html')

post_create = login_required(post_create)

CBV

방법 3 추천

# 방법 1

from django.contrib.auth.decorators import login_required
from django.views.generic import TemplateView

class MyTemplateView(TemplateView):
    template_name= "core/index.html"

index = MyTemplateView.as_view()
index = login_required(index)

# 방법 2

from django.utils.decorators import method_decorator

class MyTemplateView(TemplateView):
    template_name= "core/index.html"

    @method_decorator(login_required)
    def dispatch(self, *args, **kwargs):
      return super().dispatch(*args, **kwargs)

index = MyTemplateView.as_view()

# 방법 3

@method_decorator(login_required, name="dispatch")
class MyTemplateView(TemplateView):
    template_name= "core/index.html"


index = MyTemplateView.as_view()
728x90

공식 

https://black.readthedocs.io/en/stable/integrations/editors.html


Editor integration — Black 21.5b1 documentation

Wing IDE Wing supports black via the OS Commands tool, as explained in the Wing documentation on pep8 formatting. The detailed procedure is: Install black. Make sure it runs from the command line, e.g. In Wing IDE, activate the OS Commands panel and define

black.readthedocs.io

PyCharm/IntelliJ IDEA 적용

1. 설치

pip install black


2. black 설치된 위치 찾기

$ which black
/usr/local/bin/black  # possible location

3. IDE의 설정

PyCharm -> Preferences -> Tools -> External Tools 에서 + 버튼 눌러 아래 항목 작성 후 저장

Name: Black

Description: Black is the uncompromising Python code formatter.

Program: #which black로 찾은 위치

Arguments: "$FilePath$"

4. 저장할때 자동 포맷팅 적용

file watcher 플러그인 다운

https://plugins.jetbrains.com/plugin/7177-file-watchers


File Watchers - Plugins | JetBrains

Allows executing tasks triggered by file modifications.

plugins.jetbrains.com

Preferences or Settings -> Tools -> File Watchers + 눌러 아래 항목 작성 후 저장

Name: Black

File type: Python

Scope: Project Files

Program: <install_location_from_step_2>

Arguments: $FilePath$

Output paths to refresh: $FilePath$

Working directory: $ProjectFileDir$

In Advanced Options 에서 아래 항목 체크 해제

  • Uncheck “Auto-save edited files to trigger the watcher”
  • Uncheck “Trigger the watcher on external changes”
728x90

'Study > Django' 카테고리의 다른 글

[Django] field lookup  (0) 2021.05.25
[Django] decorator  (0) 2021.05.25
[Django] 환경 변수 분리하기 django-environ  (0) 2021.05.18
[Django] Views, Generic Views, Viewset  (0) 2021.05.11
[Django] settings.py - cors, static path  (0) 2021.05.11

+ Recent posts