2021.03.21 - [Usage/ReactJS] - Table of Contents 스크롤 메뉴 구현


Table of Contents 스크롤 메뉴 구현

createContext를 사용하여 provider, context 생성 Toc.js 생성 메뉴에서 이동 시킬 위치를 각각의 컴포넌트에서 pos로 받아와서 저장 시킬 예정 import React from "react"; import { createContext, useState }..

mugon-devlog.tistory.com

이전 포스트의 확장판입니다.

ToC 스크롤 메뉴가 구현되어 있다는 가정하에 시작하겠습니다.

스크롤의 현재 위치, 동적으로 구현하고픈 페이지의 상단과 하단 위치의 절대 값

//현재 위치가 이곳에 왔을때 active true
const [active, setActive] = useState(false);
const element = useRef(null);

useEffect(() => {
  const onScroll = () => {
    const scrollTop = window.pageYOffset + 100; //현재 위치
    //현재 페이지 상단
    const pagePosTop =
    element.current.getBoundingClientRect().top + window.pageYOffset;
    //현재 페이지 하단
    const pagePosBot =
    element.current.getBoundingClientRect().bottom + window.pageYOffset;
    if (pagePosTop < scrollTop && scrollTop < pagePosBot) {
      setActive(true);
    } else {
      setActive(false);
    }
  };
  if (loc !== 0) {
  	window.addEventListener("scroll", onScroll);
  }
  return () => {
  	window.removeEventListener("scroll", onScroll);
  };
}, [active]);

-------
return(
 <Page id="fourth" ref={element}>
 {* *}
 </Page>
)

스크롤이 페이지 영역에 들어왔을때 나타나게끔 css

styled-components를 이용해 active값을 받아 구현

const IconStyle = styled.img`
  width: 40rem;
  height: 15rem;
  animation: ${(props) => (props.active ? "fadein 3s" : "fadeout 3s")};
  @keyframes fadein {
    from {
      opacity: 0;
    }
    to {
      opacity: 1;
    }
  }
  @keyframes fadeout {
    from {
      opacity: 1;
    }
    to {
      opacity: 0;
    }
  }
`;
--------
return (
	<IconStyle src="./icon.png" active={active} />
);


728x90

createContext를 사용하여 provider, context 생성

Toc.js 생성

메뉴에서 이동 시킬 위치를 각각의 컴포넌트에서 pos로 받아와서 저장 시킬 예정

import React from "react";
import { createContext, useState } from "react";

const ToCContext = createContext([{}, () => {}]);
const TocProvider = ({ children }) => {
  const [pos, setPos] = useState({
    First: 0,
    Second: 0,
    Third: 0,
    Fourth: 0,
  });

  return (
    <ToCContext.Provider value={[pos, setPos]}>{children}</ToCContext.Provider>
  );
};
const { Consumer: ToCConsumer } = ToCContext;
export { TocProvider, ToCConsumer };
export default ToCContext;

페이지의 위치 pos에 저장시키기

먼저, context를 사용하려는 컴포넌트 바깥에서 Provider로 감싸준다.

import logo from "./logo.svg";
import "./App.css";
import Nav from "./Nav";
import First from "./First";
import Second from "./Second";
import Third from "./Third";
import Fourth from "./Fourth";
import { TocProvider } from "./Toc";
import styled from "styled-components";
const BodyStyle = styled.div``;
function App() {
  return (
    <div className="App">
      <TocProvider>
        <Nav />
        <BodyStyle>
          <First />
          <Second />
          <Third />
          <Fourth />
        </BodyStyle>
      </TocProvider>
    </div>
  );
}

export default App;


ToC.js에서 생성한 ToCContext의 pos를 useContext로 불러옴

useRef를 이용해서 컴포넌트 First의 ref값을 가져옴

해당 컴포넌트의 절대값을 구하기위해  Viewport의 시작지점을 기준으로 한 상대 좌표인 element.getBoundingClientRect(). top과 window.pageYOffset 전체 페이지에서 얼만큼 scroll 됐는지 픽셀 단위를 알려주는 값을 더 함

import React, { useContext, useEffect, useRef } from "react";
import styled from "styled-components";
import ToCContext from "./Toc";
const FirstStyle = styled.div`
  width: 100%;
  height: 500px;
  background-color: green;
`;
function First() {
  const element = useRef(null);
  const [pos, setPos] = useContext(ToCContext);
  useEffect(() => {
    const rect = element.current.getBoundingClientRect();
    setPos((pos) => ({
      ...pos,
      [element.current.id]: rect.top + window.pageYOffset,
    }));
  }, [setPos]);
  return (
    <FirstStyle id="First" ref={element}>
      first
    </FirstStyle>
  );
}

export default First;

네비게이션 구현

useEffect로 현재 스크롤 위치가 메뉴에 해당하는 컴포넌트 영역에 들어왔는지 체크 하고 들어오면 메뉴 폰트에 bold를 줌

import React, { useContext, useEffect, useState } from "react";
import styled from "styled-components";
import ToCContext from "../../../components/ToC";

const NavFont = styled.a`
  font-family: Noto Sans KR;
  font-weight: ${(props) => props.active};
  font-size: 2.2rem;
  color: #ffffff;
  line-height: 3.2rem;
  text-decoration: none;
`;
function Header({
  list = [
    {
      name: "First",
      href: "First",
    },
    {
      name: "Second",
      href: "Second",
    },
    {
      name: "Third",
      href: "Third",
    },
    {
      name: "Fourth",
      href: "Fourth",
    },
  ],
}) {
  const [active, setActive] = useState(0);
  const [pos] = useContext(ToCContext);

  useEffect(() => {
    const onScroll = () => {
      const scrollTop = window.pageYOffset;
      if (scrollTop < pos.Second) {
        setActive(0);
      }
      if (pos.Second <= scrollTop && scrollTop < pos.Third) {
        setActive(1);
      }
      if (pos.Third <= scrollTop && scrollTop < pos.Fourth) {
        setActive(2);
      }
      if (pos.Fourth <= scrollTop) {
        setActive(3);
      }
    };
    if (pos.Second !== 0 && pos.Thrid !== 0 && pos.Fourth !== 0) {
      window.addEventListener("scroll", onScroll);
    }
    console.log("active", active);
    return () => {
      window.removeEventListener("scroll", onScroll);
    };
  }, [pos]);

  return (
    <Box>
      <NavBox>
        {list.map((el, idx) => (
          <NavFont
          key={idx}
          href={`#${el.href}`}
          active={idx === active ? "bold" : "regular"}
          >
          {el.name}
          </NavFont>
        ))}
      </NavBox>
    </Box>
  );
}

export default Header;
728x90

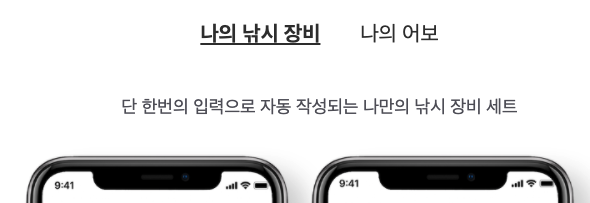
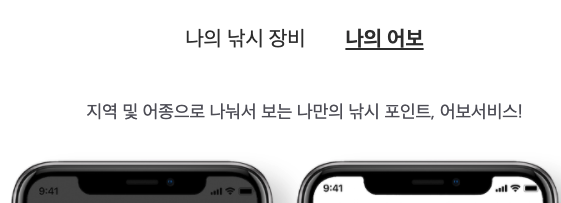
메뉴를 눌렀을때 선택된 메뉴에 bold와 underline을 주며 하단 내용을 바꿈

Tab 메뉴의 항목별로 나타낼 항목 정의

const TabUI = {
    1: (
      <TabContentsBoxStyle>
        <TabContentsTextStyle>
          단 한번의 입력으로 자동 작성되는 나만의 낚시 장비 세트
        </TabContentsTextStyle>
        <TabContentsImageStyle src="./assets/my_img1@3x.png"></TabContentsImageStyle>
      </TabContentsBoxStyle>
    ),
    2: (
      <TabContentsBoxStyle>
        <TabContentsTextStyle>
          지역 및 어종으로 나눠서 보는 나만의 낚시 포인트, 어보서비스!
        </TabContentsTextStyle>
        <TabContentsImageStyle src="./assets/my_img2@3x.png"></TabContentsImageStyle>
      </TabContentsBoxStyle>
    ),
  };

Tab 메뉴를 클릭했을때의 이벤트 정의

1. 어떤 메뉴를 클릭했는지

2. 클릭했을때, 클릭 안했을때

3. 클릭 함수

//어떤 버튼을 선택했는지
const [selected, setSelected] = useState(1);
//버튼을 선택했을때 true로 줘서 활성상태로 바꾸기, 클릭 안했을땐 false
const [rightActive, setRightActive] = useState(false);
//기본으로 보여줄 항목은 true
const [leftActive, setLeftActive] = useState(true);
//버튼 이벤트 정의
function selectMenu(props) {
if (props === 1) {
  setSelected(1);
  setLeftActive(true);
  setRightActive(false);
} else if (props === 2) {
  setSelected(2);
  setLeftActive(false);
  setRightActive(true);
}

스타일 컴포넌트에 props 전달해서 css 동적으로 변화

const TabLeftButtonStyle = styled.div`
 font-weight: ${(props)=>props.leftActive ? bold : regular};
 font-decoration : ${(props)=>props.leftActive ? underline : none};
`;

function Tab() {
  const [rightActive, setRightActive] = useState(false);
  const [leftActive, setLeftActive] = useState(true);
  }
    return (
        <TabNavStyle>
			//Tab 버튼
          <TabLeftButtonStyle
            onClick={() => selectMenu(1)}
            //아래와 같이 정의하면 styled에 props로 전달 가능
            leftActive={leftActive}
          >
            나의 낚시 장비
          </TabLeftButtonStyle>         
        </TabNavStyle>
    )
}

export default Tab

전체 코드

const TabLeftButtonStyle = styled.div`
 font-weight: ${(props)=>props.leftActive ? bold : regular};
 font-decoration : ${(props)=>props.leftActive ? underline : none};
`;
const TabRightButtonStyle = styled.div`
 font-weight: ${(props)=>props.RightActive ? bold : regular};
 font-decoration : ${(props)=>props.RightActive ? underline : none};
`;
// tab 메뉴의 버튼 눌렀을때 나타날 컴포넌트 정의
const TabUI = {
    1: (
      <TabContentsBoxStyle>
        <TabContentsTextStyle>
          단 한번의 입력으로 자동 작성되는 나만의 낚시 장비 세트
        </TabContentsTextStyle>
        <TabContentsImageStyle src="./assets/my_img1@3x.png"></TabContentsImageStyle>
      </TabContentsBoxStyle>
    ),
    2: (
      <TabContentsBoxStyle>
        <TabContentsTextStyle>
          지역 및 어종으로 나눠서 보는 나만의 낚시 포인트, 어보서비스!
        </TabContentsTextStyle>
        <TabContentsImageStyle src="./assets/my_img2@3x.png"></TabContentsImageStyle>
      </TabContentsBoxStyle>
    ),
  };
function Tab() {
	//어떤 버튼을 선택했는지
  const [selected, setSelected] = useState(1);
	//버튼을 선택했을때 true로 줘서 활성상태로 바꾸기, 클릭 안했을땐 false
  const [rightActive, setRightActive] = useState(false);
  const [leftActive, setLeftActive] = useState(true);
	//버튼 이벤트 정의
  function selectMenu(props) {
    if (props === 1) {
      setSelected(1);
      setLeftActive(true);
      setRightActive(false);
    } else if (props === 2) {
      setSelected(2);
      setLeftActive(false);
      setRightActive(true);
    }
  }
    return (
        <TabNavStyle>
				//Tab 버튼
          <TabLeftButtonStyle
            onClick={() => selectMenu(1)}
            leftActive={leftActive}
          >
            나의 낚시 장비
          </TabLeftButtonStyle>
          <TabRightButtonStyle
            onClick={() => selectMenu(2)}
            rightActive={rightActive}
          >
            나의 어보
          </TabRightButtonStyle>
        </TabNavStyle>
		//선택된 버튼에 따라 그려지는 컴포넌트
        {TabUI[selected]}
    )
}

export default Tab
728x90

주로 사용하는 곳

SPA (Single Page Application)

단순 1페이지의 PR 사이트에 적용

mediaquery를 이용해서 가로 사이즈가 줄어듦에 따른 css 조정

react-responsive를 사용해서 가로 사이즈별로 다른 컴포넌트를 불러옴

html에 폰트사이즈를 10px로 주고 구현할때 rem단위 사용 -> 좀 더 쉬운 반응형 구현 가능

전체 폰트사이즈를 1씩 줄이고 늘림에 따라 세세하게 스타일을 고치지 않고 넓은 범위의 가로 사이즈에 대응 가능

경험

mo 또는 pc 버전을 완성시킨 후 가로 사이즈를 줄여나가면서 완전히 바뀌는 레이아웃만 새로 컴포넌트를 만들어 사용

Project 생성

npx create-react-app

Library

npm i react-router-dom
npm i styled-components
npm i react-responsive

Structure

src
├── App.js
├── device
│   ├── mo
│   │   ├── MoMain.js
│   │   ├── components
│   │   ├── pages
│   │   └── style
│   └── pc
│       ├── PcMain.js
│       ├── components
│       ├── pages
│       └── style
├── index.js
└── style
    ├── GlobalStyle.js
    ├── MediaQuery.js
    └── Theme.js
  • style
    • 전역으로 적용할 css
    • 미디어 쿼리 및 react-responsive에 사용할 컴포넌트 생성
  • device : mo / pc 페이지 구분
    • pages : 각각의 페이지
    • style : 공통으로 사용하는 스타일
    • components : 공통으로 사용하는 컴포넌트 (ex: function, header, footer .. )
    • main.js : 전체 PC 페이지

전체 Style 및 Breakpoint 지정

GlobalStyle.js

import { createGlobalStyle } from "styled-components";

const GlobalStyle = createGlobalStyle`
  @font-face {
    font-family: "Noto Sans KR", sans-serif;
    font-style: light;
    font-weight: light;
    src: url("./NotoSansKR-Light.otf") format("truetype");
  }
  
  html {
    font-family: "Noto Sans KR", sans-serif;
    overflow-x: hidden;
    overflow-y: auto;
    font-size: 10px;
    @media (max-width:1900px) {
      font-size: 9px;
     }
    @media (max-width:1550px) {
      font-size: 8px;
     }
    @media (max-width:1250px) {
      font-size: 7px;
     }
  }
  * {
    font-family: "Noto Sans KR", sans-serif;
    margin: 0;
    padding: 0;
    
  }

  body {
    box-sizing: border-box;
    font-family: "Noto Sans KR";
    
  }
`;

export default GlobalStyle;
  • 사용할 폰트 불러오기
  • rem의 기준으로 할 폰트 사이즈 정하기

MediaQuery.js

import { useMediaQuery } from 'react-responsive'

const Desktop = ({ children }) => {
  const isDesktop = useMediaQuery({ maxWidth: 1680 })
  return isDesktop ? children : null
}
const Labtop = ({ children }) => {
  const isLabtop = useMediaQuery({ maxWidth: 1366 })
  return isLabtop ? children : null
}
const Tablet = ({ children }) => {
  const isTablet = useMediaQuery({ maxWidth: 1024px })
  return isTablet ? children : null
}
const Mobile = ({ children }) => {
  const isMobile = useMediaQuery({ maxWidth: 768px })
  return isMobile ? children : null
}
const Default = ({ children }) => {
  const isNotMobile = useMediaQuery({ minWidth: 768px })
  return isNotMobile ? children : null
}
export {Desktop, Labtop, Tablet, Mobile, Default}
  • react-responsive로 사용할 기기별 breakpoint 설정

 Theme.js

const size = {
  mobile: "768px",
  tablet: "1024px",
  laptop: "1366px",
  desktop: "1680px",
};

const theme = {
  mobile: `(max-width: ${size.mobile})`,
  tablet: `(max-width: ${size.tablet})`,
  laptop: `(max-width: ${size.laptop})`,
  desktop: `(max-width: ${size.desktop})`,
};

export default theme;
  • Styled-components 에 사용할 기기별 breakpoint

Router Theme.js GlobalStyle.js 적용

Index.js

import React from "react";
import ReactDOM from "react-dom";
import { BrowserRouter } from 'react-router-dom';
import { ThemeProvider } from "styled-components";
import App from "./App";
import GlobalStyle from "./style/globalStyle";
import theme from "./style/theme";

ReactDOM.render(
  <BrowserRouter>
    <ThemeProvider theme={theme}>
      <App />
      <GlobalStyle />
    </ThemeProvider>
  </BrowserRouter>,
  document.getElementById("root")
);
728x90

+ Recent posts