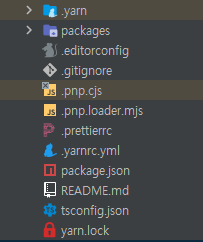
2022.04.26 - [Structure] - monorepo use yarn berry with nextjs, react storybook + typescript - 1 (root basic setting)


monorepo use yarn berry with nextjs, react storybook + typescript - 1 (root basic setting)

yarn berry 활성화 yarn set version berry yarn init yarn plugin import typescript yarn yarn plugin import typscript 자체 types를 포함하지 않는 패키지를 추가할 때 @types 패키지를 package.json폴더에 종..

mugon-devlog.tistory.com

next js + typescript 프로젝트 추가

cd packages
yarn create next-app {project} --typescript

typescript config

root의 tsconfing 세팅을 extends하여 생성

중복된 설정 제거 및 extends

{
  "extends": "../../tsconfig.json",
  "include": ["next-env.d.ts", "**/*.ts", "**/*.tsx"],
  "exclude": ["node_modules"]
}

package.json 수정

version -> packageManager

root package.json의 packageManager 복사하여 붙여넣기

{
  "name": "web",
  "packageManager": "yarn@3.2.0",
  "private": true,
  "scripts": {
    "dev": "next dev",
    "build": "next build",
    "start": "next start",
    "lint": "next lint"
  },
  "dependencies": {
    "@common/components": "workspace:*",
    "next": "12.1.5",
    "react": "18.0.0",
    "react-dom": "18.0.0"
  },
  "devDependencies": {
    "@types/node": "17.0.27",
    "@types/react": "18.0.7",
    "@types/react-dom": "18.0.0",
    "eslint": "8.14.0",
    "eslint-config-next": "12.1.5",
    "next-transpile-modules": "^9.0.0",
    "typescript": "4.6.3"
  }
}

yarn 패키지 의존성 갱신

root 위치에서 yarn 실행

yarn workspace 확인

yarn workspaces list

최종

728x90

yarn berry 활성화

yarn set version berry
yarn init
yarn plugin import typescript
yarn

yarn plugin import typscript

자체 types를 포함하지 않는 패키지를 추가할 때 @types 패키지를 package.json폴더에 종속성으로 자동으로 추가

Workspace 구성

root 디렉토리의 package.json 파일 수정

  • packages 디렉토리 하위의 모든 디렉토리를 패키지로 봄
{
  "workspaces": ["packages/*"]
}

typescript, eslint, prettier 설치

yarn add -D typescript prettier eslint

vs code 세팅

yarn dlx @yarnpkg/sdks vscode

하위 패키지(workspace)만들기

mkdir packages


typescript config

tsconfgi.json

* next js의 기본 옵션을 사용함

{
  "compilerOptions": {
    "target": "es5",
    "lib": ["dom", "dom.iterable", "esnext"],
    "allowJs": true,
    "skipLibCheck": true,
    "strict": true,
    "forceConsistentCasingInFileNames": true,
    "noEmit": true,
    "esModuleInterop": true,
    "module": "esnext",
    "moduleResolution": "node",
    "resolveJsonModule": true,
    "isolatedModules": true,
    "jsx": "preserve",
    "incremental": true
  },
  "references": [
    {
      "path": "packages/components"
    }
  ],
  "include": [],
  "exclude": ["node_modules"]
}

prettier config

.prettierrc

{
  "singleQuote": true,
  "semi": true,
  "useTabs": false,
  "tabWidth": 2,
  "trailingComma": "all",
  "printWidth": 200,
  "endOfLine": "auto",
  "arrowParens": "avoid",
  "bracketSpacing": true
}

eslint config 생략

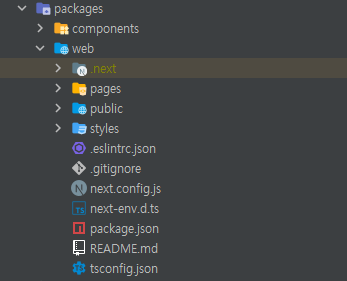
최종 구조

728x90

확장 메서드는 기존 라이브러리에 기능을 추가하는 방법

https://dart.dev/guides/language/extension-methods


Extension methods

Learn how to add to existing APIs.

dart.dev

lib/string_extension.dart

// string 객체 활장 클래스 파일

import 'package:intl/intl.dart';

extension StringExtension on String {
  String numberFormat() {
    final formatter = NumberFormat("#,###");
    return formatter.format(int.parse(this));
  }
}

확장 메서드 사용 방법 예시

import 'string_extension.dart';

print('5000'.numberFormat());
// 5,000

print('1000000'.numberFormat());
// 1,000,000

String 객체 뒤에 . 을 표시하고 정의한 확장 메서드인 numberFormat() 함수를 사용하면 됨

728x90

1. 스택으로 밑에 깔릴 이미지와 버튼아이콘 추가

2. positioned로 배경이미지 위에 올릴 아이콘 위치 고정

Stack(
  children: [
    SizedBox(
      width: 65,
      height: 65,
      child: ClipRRect(
        borderRadius: BorderRadius.circular(32.5),
        child: Image.network(
          'https://placeimg.com/200/100/people',
          fit: BoxFit.cover,
        ),
      ),
    ),
    Positioned(
      bottom: 0,
      right: 0,
      child: Container(
        width: 20,
        height: 20,
        decoration: BoxDecoration(
          borderRadius: BorderRadius.circular(15),
          color: Colors.grey[100],
        ),
        child: Icon(
          Icons.camera_alt_outlined,
          size: 15,
        ),
      ),
    ),
  ],
)


728x90

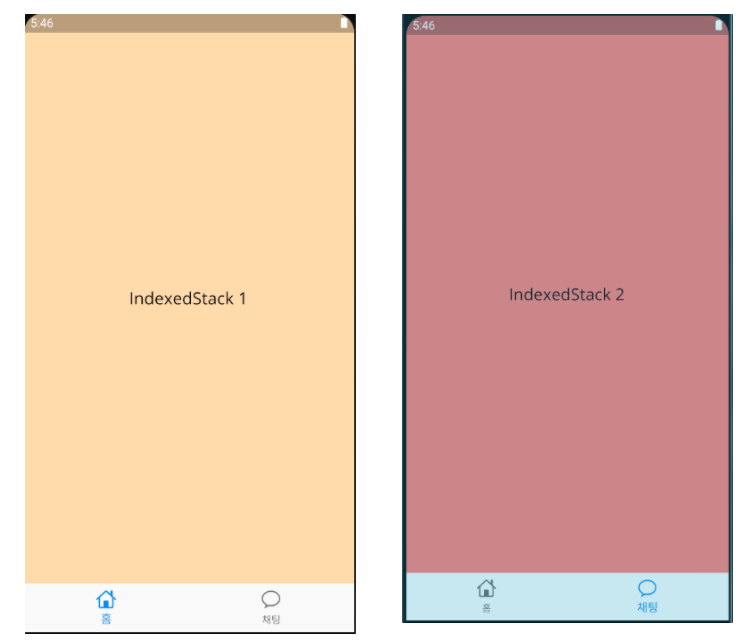
indexedStack 사용법

  1. class 내에서 int _selectedIndex = 0; 선언
  2. index: _selectedIndex, 으로 보여줄 children 세팅
  3. bottomNavigation의 ontap으로 클릭시 보여줄 index 설정
class MainScreens extends StatefulWidget {
  const MainScreens({Key? key}) : super(key: key);

  @override
  _MainScreensState createState() => _MainScreensState();
}

class _MainScreensState extends State<MainScreens> {
  int _selectedIndex = 0;
  @override
  Widget build(BuildContext context) {
    return Scaffold(
      body: IndexedStack(
        index: _selectedIndex,
        children: [
          Container(
            color: Colors.orange[100],
            child: Center(
              child: Text(
                'IndexedStack 1',
                style: TextStyle(fontSize: 20, color: Colors.black),
              ),
            ),
          ),
          Container(
            color: Colors.redAccent[100],
            child: Center(
              child: Text(
                'IndexedStack 2',
                style: TextStyle(fontSize: 20, color: Colors.black),
              ),
            ),
          )
        ],
      ),
      bottomNavigationBar: BottomNavigationBar(
        items: [
          BottomNavigationBarItem(
            icon: Icon(CupertinoIcons.home),
            label: '홈',
          ),
          BottomNavigationBarItem(
            icon: Icon(CupertinoIcons.chat_bubble),
            label: '채팅',
          )
        ],
        onTap: (index) {
          setState(() {
            _selectedIndex = index;
          });
        },
        currentIndex: _selectedIndex,
      ),
    );
  }
}
728x90

List 항목 구현

Obx 위젯으로 상태 변화 감지

Listview를 RefeshIndicator로 감싸고 GlobalKey를 넣어줌으로 화면을 아래로 드래그할때 새로고침 구현

class HomePage extends StatelessWidget {
  var scaffoldKey = GlobalKey<ScaffoldState>();
  var refreshKey = GlobalKey<RefreshIndicatorState>();
  PostController postController = Get.put(PostController());
  @override
  Widget build(BuildContext context) {
    postController.findAll();
    return Scaffold(
      key: scaffoldKey,
      appBar: AppBar(),
      drawer: _navigation(context),
      body: Obx(
        () => RefreshIndicator(
          key: refreshKey,
          onRefresh: () async {
            await postController.findAll();
          },
          child: ListView.separated(
              itemBuilder: (context, index) {
                return ListTile(
                  onTap: () {
                    postController.findAll();
                  },
                  title: Text("${postController.posts[index].title} : ${postController.posts[index].id}"),
                  leading: Text("$index"),
                );
              },
              separatorBuilder: (context, index) {
                return Divider();
              },
              itemCount: postController.posts.length),
        ),
      ),
    );
  }
}

Controller

전체 게시글을 Rx 타입으로 받아 관찰

class PostController extends GetxController {
  static PostController get to => Get.find();
  final _postRepository = PostRepository();
  final posts = <PostResDto>[].obs;
  final post = Post().obs;

  Future<void> findAll() async {
    List<PostResDto> posts = await _postRepository.findAll();
    this.posts.value = posts;
  }
}

PostResDto

게시글을 받아올때 문서 id 추가를 위해 dto 생성

import 'package:flutter_firebase_blog/domain/user/user.dart';

class PostResDto {
  final String? id;
  final String? title;
  final String? content;
  final UserModel? user;
  final DateTime? created;
  final DateTime? updated;

  PostResDto({
    this.id,
    this.title,
    this.content,
    this.user,
    this.created,
    this.updated,
  });

  PostResDto.fromJson(Map<String, dynamic> json)
      : id = json['id'],
        title = json['title'],
        content = json['content'],
        user = UserModel.fromMap(json['user']),
        created = json['created'].toDate(),
        updated = json['updated'].toDate();

  Map<String, Object?> toJson() {
    return {
      'id': id,
      'title': title,
      'content': content,
      'user': user!.toJson(),
      'created': created,
      'updated': updated,
    };
  }
}

Provider

post collection의 전체 데이터 요청

class PostProvider {
  final postRef = firebaseFirestore.collection("post").withConverter<Post>(
        fromFirestore: (snapshot, options) => Post.fromJson(snapshot.data()!),
        toFirestore: (post, options) => post.toJson(),
      );

  Future<List<QueryDocumentSnapshot<Post>>> findAll() async =>
      await postRef.get().then((snapshot) => snapshot.docs);
}

Repository

요청 결과값을 controller에 전달

class PostRepository {
  final _postProvider = PostProvider();

  Future<List<PostResDto>> findAll() async {
    List<QueryDocumentSnapshot<Post>> posts = await _postProvider.findAll();
    List<PostResDto> result = posts
        .map((e) => PostResDto(
            id: e.reference.id,
            title: e.data().title,
            content: e.data().content,
            user: e.data().user,
            created: e.data().created,
            updated: e.data().updated))
        .toList();
    return result;
  }
 }

Git commit

https://github.com/mugon-dev/flutter_firebase_blog/commit/82d8d63c0f17a86be21c327033d9c0cae86d6682


home page 전체 게시글 불러오기 구현 및 새로고침 구현 · mugon-dev/flutter_firebase_blog@82d8d63

Permalink This commit does not belong to any branch on this repository, and may belong to a fork outside of the repository. Browse files home page 전체 게시글 불러오기 구현 및 새로고침 구현 Loading branch information Showing 4 changed fil

github.com

문서 id 추가 수정

https://github.com/mugon-dev/flutter_firebase_blog/commit/99878565c8ead21b37753ebb91ebfd32d5966d3b


게시글 리스트 가져올때 문서 id 추가 · mugon-dev/flutter_firebase_blog@9987856

Permalink This commit does not belong to any branch on this repository, and may belong to a fork outside of the repository. Browse files 게시글 리스트 가져올때 문서 id 추가 Loading branch information Showing 5 changed files with 56 additions

github.com
 

728x90

+ Recent posts